Guard is the foundation of every round; this guide breaks down how to construct an impenetrable guard through disciplined stance, tight frame and elbow positioning, dynamic head movement and angles, and intelligent timing and distance control so you absorb less damage and create openings for devastating counters. Emphasis on drillable habits, clinch defense, and recovery will make your defense both durable and offensive-ready under pressure.
Types of Defensive Guard in Muay Thai
Different guards prioritize tradeoffs between protection and mobility: the High Guard absorbs head strikes, the Low Guard defends the body while inviting counters, the Cross Guard shields diagonally, the Thai Clinch controls posture, and the Shell Guard angles incoming power. Fighters switch between these based on range, timing and fatigue; small adjustments to elbow angle and foot placement change outcomes quickly. Perceiving shifts in rhythm reveals which guard will win exchanges.
- High Guard
- Low Guard
- Cross Guard
- Thai Clinch
- Shell Guard
| High Guard | Vertical forearms, tight temple coverage, best vs. straight punches and head kicks |
| Low Guard | Hands lower to protect ribs and solar plexus, risks chin exposure, useful for counters |
| Cross Guard | Forearm across face, good vs. hooks and roundhouses, allows quick cross counters |
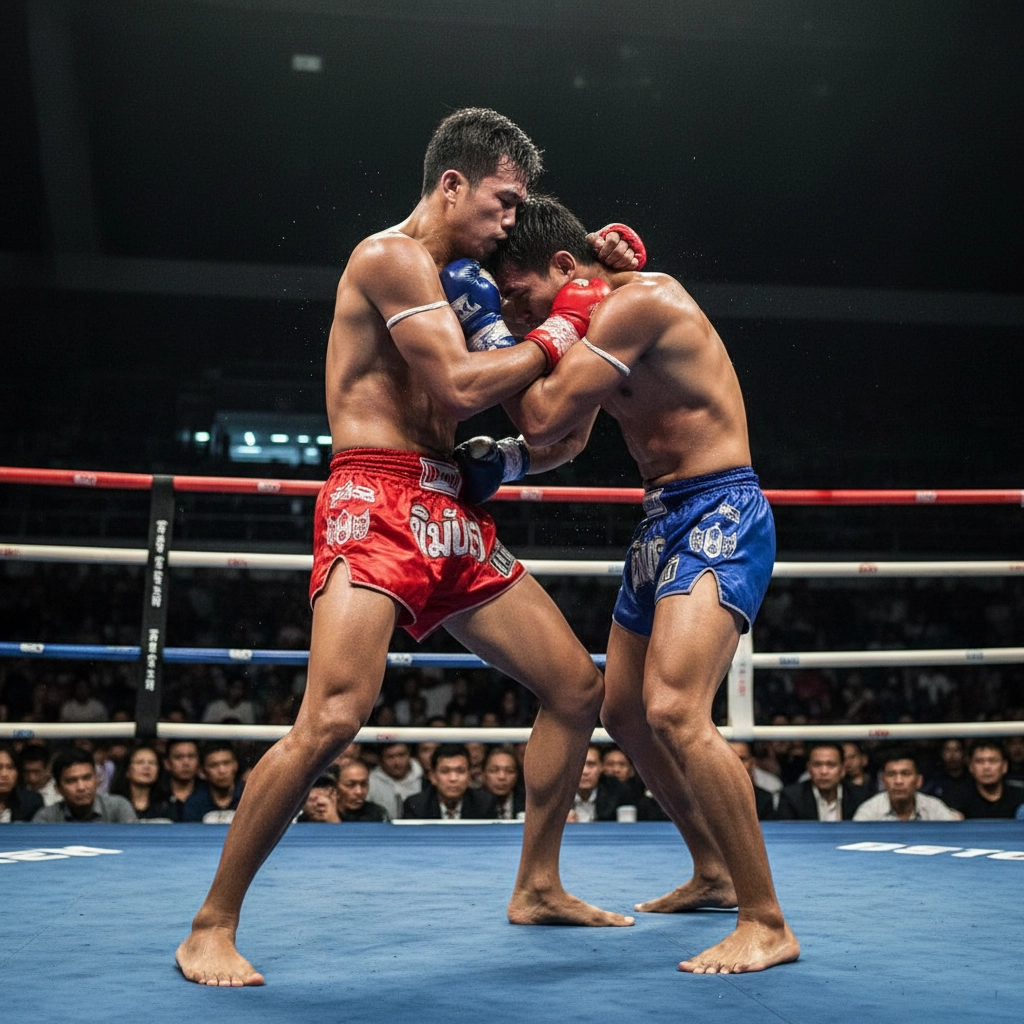
| Thai Clinch | Control opponent’s head to neutralize strikes and deliver knees; dominant in close range |
| Shell Guard | Angled blocks and shoulder rolls to deflect force, conserves energy and sets up counters |
High Guard
Used primarily to absorb head strikes, the High Guard keeps forearms vertical with gloves near the temples and chin tucked; it reduces trauma from straight punches and many kicks. Drill using 3-minute partner rounds of jab-to-forearm contact to build conditioning and timing. Maintain a firm collarbone brace to turn impact into the shoulder, and practice immediate parry-to-counter sequences for swift offense off the block.
Low Guard
The Low Guard positions hands lower to protect the body and bait opponents into overcommitting; it excels for fighters who counter with hooks or clinch entries but creates chin exposure that skilled opponents exploit. Use it selectively when you read rhythm changes or when conserving energy between high-intensity exchanges.
To mitigate risk, combine the low posture with constant head movement, quick slips and angled footwork: slip outside a jab then return the hook, or step into a clinch after a missed cross. Drill timed counters-slip, step, and throw a 1-2 in under 0.6 seconds-to convert openings into scoring strikes.
Cross Guard
The Cross Guard places one forearm across the face and the other near the jaw, creating a diagonal shield that stops hooks and redirects roundhouse trajectories; it also sets up immediate counter-crosses and elbows. Train it with partner sweeping kicks aimed at the shoulder line so you learn to absorb and return fire in one motion.
Effective application requires tight shoulder engagement and quick hip rotation to convert blocks into power counters; common mistakes include leaving the back hand idle and failing to reset stance. Drill 5-round sequences of block-counter drills with escalating speed to build reflexive transitions from defense to offense.
Key Factors in Choosing the Right Guard
Choosing a guard depends on range, mobility, and the offensive weapons you favor: long fighters often adopt a teep-focused stance while heavy hitters require a compact high guard and tight chin protection; endurance and transition speed matter too, so test guards across realistic 3-minute rounds and review footage to find consistent openings. This forces practical adjustments that reveal which guard survives under pressure.
- Fighting style – pressure, counter, or technical
- Reach & range – long vs short fighters
- Mobility – ability to pivot and return fire
- Stamina – guard that conserves energy over rounds
- Opponent tendencies – teeps, clinch, or looping hooks
Fighting Style
Pressure fighters who chain knees and clinch need a guard that deflects strikes while enabling immediate clinch control; conversely, a counter-focused stylist requires a mobile parry-and-teep setup to create sharp return angles. Embed 3-minute sparring rounds emphasizing 6-8 clinch entries per session to validate whether your guard supports the offense you plan to run.
Opponent’s Strategy
Adjust your guard to neutralize the opponent’s primary tools: if they favor the long-range teep and low kick, widen your base and use an active lead-leg check; if they close distance with hooks, tighten to a high, compact shield and employ lateral head movement. Analyze at least 10 minutes of tape to catalogue repeated sequences and build targeted drills around them.
Map the opponent’s most-used sequences-mark their entry points (jab, feint, or low-kick setup) and program guard changes at specific round moments, like at 2:00 and 1:00 remaining. Implement a 6-week prep cycle with 3 technical sessions weekly focused on those sequences; use drills such as “block-and-return” (parry five teeps, answer with a low kick) to break their rhythm and test your guard under predictable pressure.
Situational Awareness
Ring position, time left, and the scoreboard should shape guard selection: on the ropes favor a compact protective posture and quick clinch escapes, while in center ring use a lighter guard to exploit angles and counters. Coaches often switch to conservative protection with the last 30 seconds if ahead, whereas trailing fighters must open lines to generate scoring opportunities.
Practice situational drills where the corner signals “press” or “protect” mid-round; simulate being down on points with two rounds left and force three sparring rounds focused on creating or denying two clear scoring sequences per round. Develop the habit of brief corner glances at natural breaks so your guard adapts instantly to tactical shifts during a fight.
Tips for Enhancing Your Guard
Integrate short, specific drills: 3-5 minute rounds of focused blocking, 50+ parry repetitions, and partner pad work that forces reactive covers. Emphasize sealing the forearms to protect ribs and temple, then add timing drills against teeps and low kicks. Any drill should pair guard work with footwork and head movement to create a dynamic, resilient defense.
- Guard
- Stance
- Footwork
- Movement
- Head movement
- Blocking
Proper Stance
Keep weight slightly rearward (about 55/45), knees soft at ~20-30° and feet shoulder-width plus one fist for balance; hands stay high-lead at cheekbone, rear at jawline-to shield the temple and chin. Maintain elbows tucked to close elbow openings, and practice moving the stance 30-50 cm to check distance while keeping the guard intact.
Incorporating Footwork
Use short, decisive steps: slide 30-50 cm laterally, step-pivot 45° to exit lines, and avoid crossing feet which disrupts guard. Train 3×2-minute rounds of shadow work where every offensive action is followed by a 1-step reset, ensuring the hands return to blocking positions within 0.5-1 second.
Drill specifics: ladder and cone drills for 100 repetitions per session, plus 5 rounds of partner mitt work where the defender moves after every combo. Focus on keeping the rear hand aligned with the jaw during pivots and use quick pivots (10-20 per round) to create counter angles without dropping the guard.
Continuous Movement
Adopt constant micro-adjustments-small 5-15 cm steps and subtle head slips-to deny static targets and reduce the impact of single strikes. Alternate 30-45 second movement bursts with stationary technical rounds so you build stamina and the habit of defending while on the move.
Practice regimen: perform 3×3-minute rounds of continuous circling with a partner delivering feints every 8-12 seconds; combine lateral slides with 2-3 head slips and immediate hand recovery. Measure progress by keeping guard coverage above 90% of the time during a drill and by reducing the number of openings per round to less than two.
Step-by-Step Guide to Building Your Guard
Step-by-Step Guide to Building Your Guard
| Step | Key Focus |
| Starting Position | Feet shoulder-width, weight 55/45, gloves at cheekbone level, elbows tight to ribs, chin tucked, 30-40 cm lead distance |
| Executing Defensive Movements | Blocks, parries, slips, checks; 50+ parry reps per side, 3-5 minute defensive rounds, hands return within 0.5s |
| Integrating Offense with Defense | Immediate counters within 0.3-0.6s, practiced combos (parry→cross→elbow; check→teep), 3-minute block-and-counter rounds |
Starting Position
Set a stable base: feet shoulder-width with weight ~55/45 on the back leg for mobility, and hold your gloves at cheekbone level with forearms vertical and elbows snug to the ribs to protect the body. Tuck the chin and keep eyes on the opponent’s torso; maintain a 30-40 cm lead distance so you can check kicks and close to clinch. Drill returning to this stance in 3-minute rounds until it’s automatic.
Executing Defensive Movements
Mix blocks, parries, slips and checks, delivering blocks with forearms angled to deflect and parries via quick wrist rotation; target doing 50+ parries per side per session and 3-5 minute defensive-only rounds. Ensure hands return to the high guard within 0.5 seconds after every deflection, and pivot the hips 10-20° on slips to avoid linear follow-ups.
For example, check roundhouses by lifting the shin at a 45° angle and stepping back 10-20 cm, then counter immediately; use partner drills of 6 sets where the attacker throws 3 strikes and the defender blocks/parries then counters on the third. Track reps and progressively add speed: 6-8 sets at 60% intensity, then increase power once timing is consistent.
Integrating Offense with Defense
After a successful block or parry, transition into counters within 0.3-0.6 seconds: common sequences include parry→right cross→left elbow or check→lead teep→follow-up low kick. Practice 3-minute block-and-counter rounds (2-minute rest) for 4 rounds, focusing on initiating the counter quickly while keeping your guard intact between exchanges.
Drill specific combos 8-10 reps each at 60-70% power to build timing before adding force: for instance, parry-high cross then step off-line into a hook, or check a leg kick and pivot into a lead teep to the thigh. Emphasize resetting to the high guard within 0.5 seconds after every counter to minimize exposure.
Pros and Cons of Different Guards
Weighing guard choices by opponent style and round tempo matters: below is a compact comparison to help pick the right defense for a camp, sparring session, or fight plan. Use the table to match protection priorities against mobility tradeoffs.
| Pros | Cons |
|---|---|
| High Guard: Excellent head protection, strong vs. hooks/overhands | Reduced vision, slower counters, can tire neck/shoulders |
| Low Guard: Better mobility, easier to check and counter kicks | Exposes chin to jabs, hooks, and uppercuts |
| Cross-Arm/Shell: Efficient energy use, good for absorbing combinations | Vulnerable to body shots and quick inside hooks |
| Long/Distant Guard: Maximizes range, ideal vs. heavy kickers | Less effective in close clinch exchanges or vs. short punches |
| Peek-a-Boo: Strong counter-punching platform, tight defense | Physically demanding; less practical over five rounds without conditioning |
| Teep‑Focused Guard: Optimizes front-leg defense and counter teeps | Leaves headline openings versus looping hooks and feints |
| Clinch-Centric Defense: Neutralizes kicks and sets knees/throws | Requires top clinch skill; poor outside striking defense if released |
Advantages of the High Guard
When facing heavy punchers or short-range pressure, the high guard delivers reliable head and temple protection, enables repeated blocks of hooks and crosses, and funnels opponents into clinch or counter windows; many fighters use it to survive early rounds and conserve points while hunting counter opportunities.
Disadvantages of the Low Guard
Dropping the hands improves mobility and kick-checking but leaves the chin and temples more exposed, increasing risk from quick hooks, uppercuts, and feint-driven counters; success demands elite timing, lateral footwork, and constant sighting of the opponent’s shoulders.
In practice, fighters who adopt a low guard often compensate with tight footwork, head movement, and active parries-drills like 50 rapid parries per round and 3×3 meter lateral shuffling build the necessary instincts. Common failures include late elbow raises against hooks and poor distance control, which produce clean openings for power shots; train specific counters and recovery sequences to mitigate these vulnerabilities.
Common Mistakes to Avoid
Three recurring errors sap even well-trained guards: poor situational awareness, over-reliance on a static block, and sloppy footwork. Each mistake magnifies risk-missing a kick setup, taking accumulative body shots, or getting cornered-so address them with targeted drills, partner feedback, and measurable goals like completing 3-5 minute mobility rounds and recording sparring to analyze mistakes.
Inadequate Awareness
Failing to read an opponent’s cues-hips, shoulder torque, and weight shifts-means reacting late to kicks, elbows, and clinch entries. Use drills that force scanning (partner jabs randomized at 5-10 second intervals) and practice recognizing pre-movement windows to reduce reaction time; spotting hip rotation often predicts strikes before the arm or leg commits.
Over-reliance on Guard
Relying solely on a high block turns defense into a passive solution: opponents will chain punches, bait the guard, then exploit angles or low targets. Mix blocks with parries, clinch entries, and counters so defense becomes an offensive tool rather than just damage mitigation; passivity invites combinations that break posture.
Fix this by structuring sessions: 50 parry repetitions, 3-5 minute rounds where every successful block must be followed by a counter within one to two seconds, and partner drills forcing angle changes after the block. Emphasize returning to neutral stance, using the hips to drive counters, and recording sparring rounds to quantify how often you counter versus only absorb.
Neglecting Footwork
Static guards fail when the fighter can’t manage distance or create angles; stalled footwork leads to liver shots, leg-kick accumulation, and being trapped on the ropes. Incorporate lateral steps, 30-45° pivots, and balance drills to convert a static block into a mobile, position-controlling defense-angle creation beats brute blocking.
Practical fixes: ladder or cone drills for 3-5 minutes, 50 lateral steps per leg, and shadowboxing rounds where every punch must be followed by a step or pivot. Track progress weekly-improvements in ring positioning and fewer hit confirmations in sparring signal the footwork is becoming integrated into your guard.
Summing up
Now refine your stance, guard and head movement to create a compact, reactive defense that minimizes openings. Prioritize angling, footwork and timing, reinforce checks and blocks through partner drills and pad work, and integrate clinch control for close-range protection. Consistent repetition, situational sparring and incremental pressure testing build resilient defensive reflexes that translate to reliable in-ring security.
FAQ
Q: What are the fundamental components of an impenetrable Muay Thai guard?
A: A solid guard combines posture, hand and elbow placement, weight distribution and active framing. Keep the chin tucked, rear hand protecting the jaw and temple, lead hand slightly forward to control range and parry, and elbows tight to shield the ribs and liver; raise the shoulder to help cover the chin against hooks. Maintain a balanced stance with knees soft and weight slightly rearward so you can absorb strikes, check kicks, and pivot; use the forearms to block kicks and body shots while the hands intercept punches. Train the guard as an active system-covering, parrying, catching, and immediately resetting-rather than a static shield.
Q: How do I defend effectively against kicks, knees, and punches while maintaining that guard?
A: Against roundhouse kicks, turn the shin outward to check or step slightly off-line while using the forearm to mitigate head kicks; catch kicks with both hands and counter with a teep or low kick to the base. For knees, control distance and posture-whip the head back, frame with the forearm, pummel the arms in the clinch and circle off the line to force safer angles. Versus punches, use tight parries, slips and shoulder-high covers, then counter immediately; combine subtle footwork and angle changes so you don’t absorb linear combinations. Always finish a defensive action with a counter or reset to regain control of range and rhythm.
Q: What drills and progressions build a reliable defensive guard under pressure?
A: Start solo with shadowboxing focused entirely on maintaining guard through movement, then add resistance: partner mitt drills where attacker throws set combos and defender only blocks/counters, catch-and-counter kick drills, and progressive touch sparring that increases intensity as consistency improves. Incorporate pummeling and clinch rounds to train arm position, neck and core conditioning to withstand impacts, and randomized drill stations (punch, kick, clinch) to force decision-making under fatigue. Measure progress with video review and coach feedback, increasing speed and complexity only after technique and recovery remain solid.