Why the Clinch Defines Close‑Range Success in Muay Thai
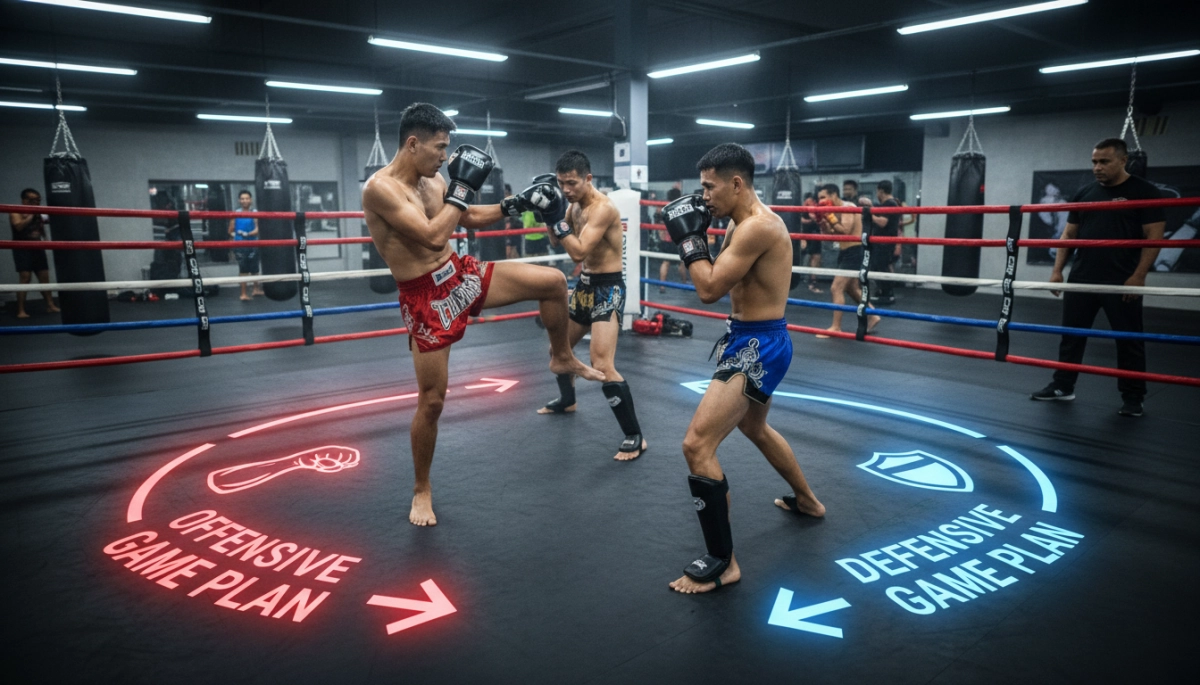
The clinch is where fights are won or lost by control, timing, and balance. When you understand the clinch, you control space, remove your opponent’s striking range, and create high‑percentage knee and elbow opportunities. This section focuses on the practical mechanics you must internalize: where to place your hands, how to position your head and hips, and the small adjustments that convert a neutral clinch into offensive dominance.
Key Principles of Clinch Control You Must Know
- High hands, low hips: Secure the collar tie or “plum” with your hands while compressing your opponent’s posture with your head and chest. Prevent them from posturing up to land long knees or short elbows.
- Maintain a strong base: Keep your feet shoulder‑width with knees slightly bent. Your balance should be mobile, not rigid—ready to step, pivot, or sprawl.
- Weight distribution matters: Drive your weight forward through the hips to pin your opponent; shift laterally to off‑balance them and create knee lanes.
- Head position is an offensive tool: Use your forehead or crown against their chest or jawline to control posture and add pressure.
- Handfighting first: Before heavy knees, win the hand ties—pummel for inside control, peel grips, and establish frames that open striking windows.
Core Grip Variations and How They Change the Fight
Grip choice dictates your options. The double collar tie (plum) gives strong control for straight knees and upper‑body manipulation. Double underhooks allow you to lift and off‑balance an opponent for throws or trips. Single underhook with a whizzer (overhook) lets you circle and create separation for strikes. You should practice each grip transition until it becomes instinctive under pressure.
Practical Drills to Build Reliable Clinch Habits
Drill these movement patterns to turn theory into reaction:
- Pummeling rounds: 60‑second exchanges focusing only on getting inside control without striking.
- Plum compressions: Chain short knees while maintaining the double collar tie, focusing on posture collapse and breath control.
- Off‑balance drills: Use foot pivots and hip checks to trip or sweep an opponent after securing an underhook.
As you practice, pay attention to common mistakes—head too low, hands passive, or relying on strength rather than angles—and correct them immediately. With this foundation in place, you’ll be ready to layer in specific offensive sequences and the counters opponents use to break your control.
Next, you’ll move into the most effective offensive sequences from each control position and the step‑by‑step counters your opponent will try, plus how to neutralize them in live drills.
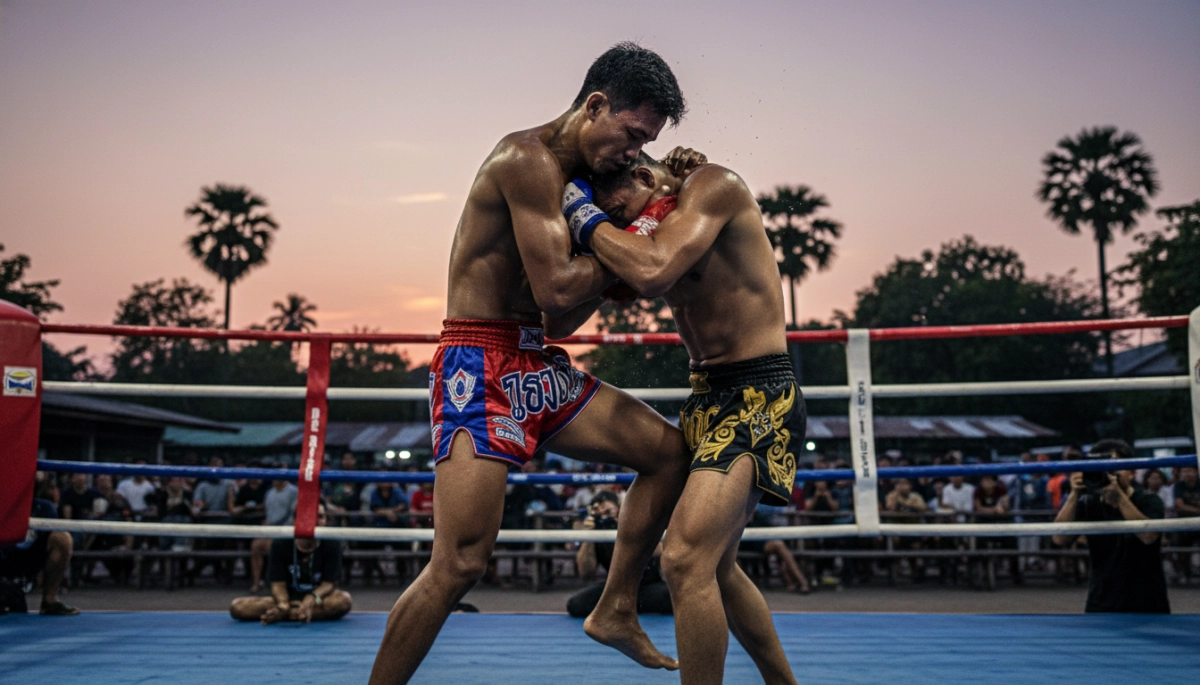
Offensive Sequences from Dominant Clinch Positions
When you secure a control position, follow a short, repeatable sequence rather than improvising. Sequences create rhythm and make your attacks predictable to you but not to your opponent. Here are three high‑percentage chains you should drill until they become automatic.
- Plum (Double Collar Tie) Sequence: Compress the posture with your forehead to the sternum, step your lead foot slightly off the line, and fire two straight knees to the midsection (one per hip). On the second knee, maintain the plum and shift your weight to the opposite hip to open the upper elbow lane—deliver a short elbow or a crossface to disrupt their counter hand. Finish the chain by switching your hands to a body lock and loading their near leg for a hip trip.
- Double Underhooks Sequence: Elevate their ribcage with a tight chest‑to‑chest frame, create a small lateral step to unweight their base, then drive a short knee into the thigh/solar plexus to force a lowered stance. Use the underhooks to lift and rotate them across your thigh for a sweep or drop them onto their hip and follow with two knees and an off‑balance uppercut/elbow.
- Single Underhook + Opposite Overhook (Control & Angle): Use the underhook to drag their elbow across their body, step offline toward the underhook side, and snap a quick knee to the open lane. If they throw a whizzer, clamp the arm with your head and free hand, circle out, and convert to a rear clinch or hip toss.
Key mechanical notes: always pummel immediately after each strike, keep your head engaged as a third hand, and vary knee depth (high for ribs, low for thigh) to keep counters guessing.
Common Counters Opponents Use — and How to Neutralize Them
Expect opponents to try a small set of repeatable counters; learning to anticipate them will neutralize their options quickly.
- Posture Up to Break the Plum: They will try to posture and create space. React by tightening the plum, sliding your crown up under their chin, and immediately firing a knee to either the solar plexus or thigh. If posture persists, re‑establish control by framing on their biceps and stepping behind their lead leg for a sweep.
- Heavy Pummeling to Steal Inside Control: When they aggressively pummel, stabilize with a forearm frame on the sternum and reset your hands by switching to a single underhook on the contested side—use your head position to block their climb.
- Whizzer and Hip Throw Attempts: Counter the whizzer by compressing your shoulder into their chest, lowering your center of gravity, and rotating your hips toward the whizzer side to nullify torque. If they commit to a throw, release to a sprawled base and immediately re‑pummel or secure an ankle to trip.
- Blocking Knees (Catching Thighs): If they block your knee with their hands, transition quickly to short elbows, a body lock grind, or switch to a pulling knee (to the head) by collapsing the opponent’s posture while dragging them into your knee.
Live Drill Progressions to Make These Habits Automatic
Structure practice so the drills move from cooperative to high pressure in three phases:
- Phase 1 — Technical Reps (3–5 min rounds): Start stationary; one partner holds a passive plum while the other runs the plum sequence (2 knees, elbow, sweep). Swap roles. Focus on head position, pummeling, and foot placement.
- Phase 2 — Progressive Resistance (4–6 min rounds): Increase resistance in three 60‑second blocks: cooperative, 50% effort, then 80% effort. Add one live counter allowed per block (posture up, pummel, or whizzer) and practice the appropriate neutralization on the spot.
- Phase 3 — Conditioned Sparring (5–8 min rounds): Start each round by clinching for 10–15 seconds only; scoring favors positional control and successful counters rather than strikes. Rotate partners and focus on chaining your sequences into escapes or finishes under fatigue.
Consistent repetition across these phases builds timing, makes counters predictable, and converts isolated techniques into fight‑ready instincts.
Closing Notes for Clinch Mastery
Mastery of the clinch is less about perfecting a single move and more about developing dependable habits that hold up under pressure. Stay curious, seek feedback from coaches and training partners, and be patient with incremental progress. Prioritize smart drilling, gradual escalation of resistance, and recovery—your body and timing improve together.
Make studying and adapting part of your routine: watch high‑level fights for timing cues, keep a short training log to track what works under fatigue, and treat every sparring session as data. For official rules, safety guidance, and tournament resources, consult the governing body’s materials such as IFMA resources.
Key Takeaways
- Train habits, not just techniques: prioritize repeated, focused reps and progressive resistance to build instinctive responses.
- Control starts with position and movement—use pummeling, head placement, and weight distribution to create opportunities, not brute force.
- Integrate feedback and conditioning into your plan: coach input, live drills, and recovery produce consistent in‑fight execution.